Wednesday, September 30, 2020

Simple Ball Bounce with Maya and Renderman

Simple Ball Bounce Reel

This is a simple ball bounce created in Autodesk Maya and rendered in Pixar's Renderman.  For this animation I had a total of 5 passes.  The ball rig is from UCF's FIEA program.

For my first pass of creating my ball bounce it was all about reference.  Finding reference that had an easy angle to work with an gave a good view of timing and how the ball was moving.   My first pass really was all about getting the timing of the ball, weight, and rotation. 
During my second pass I tweaked my rotation and used the graph editor to show more weight in my ball. I also brought in more squash and stretch when the ball hit the ground. At this point I set up my rendering scene for renderman and created my lights, material, and camera.
In my third pass I adjusted my rendering angle and gave the ball some jiggle as it is rolling and coming to a stop.  
For the fourth pass I focused on getting the ball to have a little more jiggle while it is in the air.
For my final pass I added more frames to the end of my animation and adjusted a few keyframes so that my ball comes to a softer and slower stop. 

Use of Composition


Use of Composition

For this piece I worked a lot on composition.  I was mostly inspired by the colors used in Destiny on the moon destination and the idea of someone waiting on a mysterious planet.  I also really wanted to incorporate a planet in the back ground.

Reference and Inspiration

When coming up with the idea for the kind of composition I wanted to do I found that the rule of 3rds brought it out the best and before I created my scene, I really tried to make sure that the mannequin was placed in a spot that caught the eye.

Rule of 3rds

To start my project, I began in Maya with a scene full of space and mountain assets.  I moved the assets around and created a sphere for my background planet.  I also added some more lights and adjusted the lights that were already in the scene and created a camera for my beauty render. 

Putting Scene together in Maya

I then created an ID map, normal, AO, Z depth, and toon shader render layers to use in Photoshop.
Layers in Photoshop

In Photoshop, I began making different layers with the render passes.  I used the ID map for selecting objects to individually put color or gradients on them.  The AO map was used to bring out the shadows and a few highlights.  It mostly set the mood in the illustration.  I used my toon shader to create the lines and details in my illustration and Z depth was used to create a slight green fog over the environment.  I did not use my normal map but it was helpful for showing me where the highlights and shadows are. 

Using Toon Shader

To bring more character into this piece I created some FX to give my building into the distance some light, rocket blast to my space ship, and heavier green fog or light to my environment.  For all these effects I painted them onto my scene with an airbrush that had color dodge and then I would adjust the opacity.

Creating Fog

The last effect I added to my scene was the stars in the background.  To create my stars I applied it only to the background and under the planet.  To create this effect I used the noise filter along with the gaussian blur filter.  I then adjusted levels and on the effect itself I added outer glow.

Creating Stars


Sunday, September 27, 2020

Game Asset Creation: A Simple Crate


Simple Crate Model


This week I created a simple crate asset in Autodesk Maya. To start my project I had to adjust the scale in Maya so that when the asset is imported into the Unreal Engine it is in proper scale.  I set my length and width to 200 units and my grid lines to 100 units.  I also set y subdivisions to 10 for easy snapping and I put some simple coloring on my grid so that it is easier to work with. 

Adjusting Maya to the Unreal Engine Scale

Then I began to create my proxy crate in which I made 100 units all the way around and checked it's scale to the mannequin.  The Mannequin is about 6 feet tall.  To create my proxy I did some simple extrusions. I then exported it and gave it a collider.  I noticed that the lighting on the crates were creating weird shadows so I brought it back into Maya and fixed it's UVs before re-importing it into the Unreal Engine. 

Crate in Unreal Engine 4

From here I began to create a more high poly crate that has details.  To begin I used a cube that was the same size as my proxy and scaled it down to that it was the same size but was thinner and fit the face of the proxy.  I used some simple Booleans to create the frame and beveled it and then created the smaller pieces and gave those bevels.  For the piece that goes across I duplicated my Boolean and created a face and from there I used my multi-cut tool and deleted the faces I did not need.  The I extruded it and beveled it.  I placed it and scaled it to fit on the crate. 

Proxy for Crate Details

To continue, I grouped, named, duplicated and rotated the first face to create the other faces.  Some of the faces a bit different weather they don't have the middle piece or they need their edges snapped so there is no inter penetration.  This allowed me to create my gaming asset crate. 

Details Creating Crate Object

I then began to prepare my crate to be exported into it's next journey into ZBrush! I duplicated my create and created a new group.  Within the group I merged the bottom of the crate into one geometry and then merged the top so that the crate has a top that can open.  I then created a simple layer so that I can change the color of the wireframe.  

Crate with Black Wireframe

Crate Open with Lid

Wednesday, September 23, 2020

Basic use of Lighting

 This week I worked on creating 3 point lighting using Autodesk Maya and Arnold. 

Lighted Characters

Lighted Lego Project

To start this project I worked with three different models and included my own Lego model from the Lego project. To start my project I imported the four different models and created an aiAreaLight, point light, and an aiSkyDomeLight.  The first light I set up was my aiAreaLight which is my key light.  I scaled it and rotated it into position.  I then went into the attribute editor and adjusted the intensity and shadow drop off.

Adding AiArea Light

Then I created aiSkydomeLight  and put it's exposure to 1 and it's intensity to 0.050.  

Adding AiSkydome Light

The last light I created was my point light.  I added a light color to the point light and adjusted the intensity and exposure. I also turned off emit specular.  

Adding Point Light

Then I created an aiStandardShader and applied it to my models.  In the hypershade I created an aiAmbientOcclusion node and plugged it into the base.  I then put the weight to 0.500 and gave the shader a subsurface. 

Creating an AiStandard Shader

After creating my shader and applying it to my models, I created a camera to make renders for three different sides of the models except the Lego model because it is the same on most sides. I also added the posturize filter.

Posturize Render with Alien Character

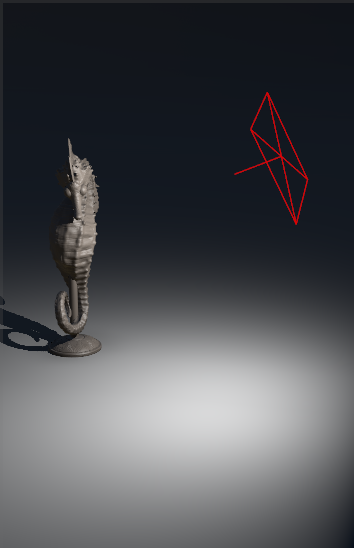
Posturize Render with Sea Horse Character

Posturize Render with Character Face

Posturize with Lego Spaceship


Monday, September 21, 2020

Lego Project Part 2

           Lego Rocket Model


            Hotdog Rocket and Hamburger 


To continue my Lego project,  after I brought my Lego pieces into Unreal Engine 4,  I began to assemble my rocket and create blueprints. I also created a hotdog rocket and hamburger out of the Lego pieces I made.

Blueprints of Lego Pieces

I then created a materials for my Lego pieces and instanced them off of my first Lego piece material. 

Meterials for Lego Pieces

 I was then read to set up my render scene.  Going back into Maya, I created an infinity wall and imported it into the unreal engine.  I added exponential height fog, post processing volume and a spot light to create an atmosphere.   

Creating Atmosphere 

 After setting up my models I created a small amount of rotation using blueprints to rotate my rocket.  When trying to rotate my hotdog rocket, the hotdog rotated too much so I decided to not rotate that model.  

Creating Rotation Blueprints

From here I made a sequence and set up my camera movements.  I exported my sequence out to get my video render of my project. Between both models I changed to infinity wall material to rea

Lego Rocket Ship in Unreal Engine 4

Lego Food in Unreal Engine

Wednesday, September 16, 2020

Value and Contrast


Color and Contrast

This week I learned about value and contrast.  As someone who is still learning Photoshop I was both excited and intimidated about the project.  To start my project I went to look for references and ideas for the look I was going for.  After restarting my project multiple times I had the idea of having colors similar to the colors used on the vehicles from Tron.  From there I thought about other references that has neon colors and then I thought about the colors used in the KDA League of Legends music video and my idea grew from there. 

Reference and Inspiration

To start my project, I had several renders from Maya with the vehicle and the mannequins that all had different data on them such as the line work and normal maps.

Scene with Line Work


I first brought my normal map into Photoshop and then looked at the red, green, and blue channels.  I made a copy of each of these channels and worked heavily on the green channel.  I copied the green channel and created a solid color layer to create color in the environment, vehicle, and mannequins.  Overall I had three of these layers in my file which were the main source of color on the objects. Two of these were to create a color on top and the last one selects the inverse to get the color on the bottom.

 
Photoshop Layers

From here I started to create groups for all of my different renders and groups to hold all of my different colors for individual pieces. 

Creating Groups in Photoshop for my layers

Then I imported my ID render and had it as my top layer.  I would use my magic wand tool and turn down the tolerance to 1 and turn off contiguous.  This allowed me to select individual pieces of the vehicle and mannequins so I could change the color individually.  I did this for pieces such as the wheels and windows on the vehicle.  I did a similar process for the pieces that have some gradient on it.  Instead of having it be a solid color layer there would also be a gradient layer that is above it to create the gradient.  This is an example of a few of my individual colors and gradients.  I also added the Ambient Occlusion layer which had a big effect on all of my colors.

Creating Gradients

Determining the colors for this project was really hard because many of the colors would compete against one another or the color combination did not compliment each other the way I was looking for them to.  A big part of getting the colors compliment one another was getting the background colors to pop out the colors used on the vehicle and mannequins. To start I put a black background and I thought about what needed to be on the outside of the vehicle to make it pop.  I got my idea of paint splatters after looking at some photos of the KDA video and began making my paint splatters.  Right around the edges of the vehicle I used the opacity of 100% but as I got further away I brought the opacity down to 30%.  I chose to use the colors cyan, pink and orange.  I then created fog using the Z depth render and made that into a light cyan color to create my background. 

Adding Fog

My last step was to create some small FX.  I used this to create the small glow on the mannequin's helmet, lights on the vehicle, and beam coming from the satellite.  I created a layer and put it on the color dodge mode.  I then used an airbrush and put that too on the color dodge mode and selected a color.  From here I did some painting in the areas that needed some glow. 

Creating Glow on the Mannequins


Monday, September 14, 2020

Lego Project

 For this project I built a 3D model off of a Lego reference. I chose a very simple Lego reference but my biggest obstacle was defiantly trying to figure out the scale to make the pieces look like they would all fit together.  

Lego Reference and Inspiration

Modeling the Legos was a lot of math.  While looking at the simple shapes, this reference is made up of mostly cylinders but to get the right size it was a lot of looking at the pieces and determining how many pieces of one Lego would equal another Lego.  For the stand I knew that four singular pieces would make a 2X2 piece with a total of 4 nibs.   One of these pieces would equal half of the the stand.  If I had two 2X2's then it would equal the length of the base being 2X4.

Creating Lego Piece

After putting two of these pieces together for length, I extruded the top piece out a little bit and rotated to give it the ability to create the long angular shape.  

Custom Lego Piece

All of my pieces went through a similar scaling and size process.  The tools I used a lot were the scaling, extrude, and edge loop tools to get my final result!  

Creating All My Lego Pieces Top View

Creating All My Lego Pieces

Tuesday, September 8, 2020

Ship Silhouettes

 This week I created some silhouettes of nine different spaceships using Maya and Photoshop. 

Ship Silhouettes

I started out in Maya with a spaceship model that was already completed.  To get the scene ready, I used my perspective camera to get a top view of the ship and then duplicated the camera and made small adjustments to the placement.  Once the camera was in place I created a keyframe on the camera in case I accidentally move it.  I then hid the lights in the scene to turn the model black. 
Already Completed Ship


From here the model was ready to be modified!  By duplicating, scaling, using soft select, creating new objects, and extruding, I was able to create new ship designs.

Modified Ship Design

Once I got the design I was looking for, I took a screen shot of the ship and brought it into Photoshop.  I set up my Photoshop file by creating two color filled layers to create the background and the bar at the bottom of the file.  I then created some simple numbering for the different ships and added my name and file name at the bottom.  From here I created a layout for the spaceships and created two groups for the top and bottom rows which are held in a big folder for holding all the designs.

Photoshop Layers

From here I created all my ship designs in Maya and imported them into Photoshop.  I cleaned them up with the magic wand tool to take out the background and scaled them and repeated until I got the final result!

Sunday, September 6, 2020

Snowy Minecraft like Level

 This week I learned more about Unreal Engine 4 as I created my own Minecraft-ish level.  This was a fun project as I had many ideas for the kind of level I wanted to create and ultimately chose a snowy sakura tree environment.  

Snowy Minecraft Level Angle 1

Snowy Minecraft Level Angle 2

Snowy Minecraft Level Angle 3

Before I started anything, I though about the colors I wanted in my level and took reference from nature.  After looking on the web for examples I made a board to get my idea across and the general look of the colors. 

Reference and Inspiration

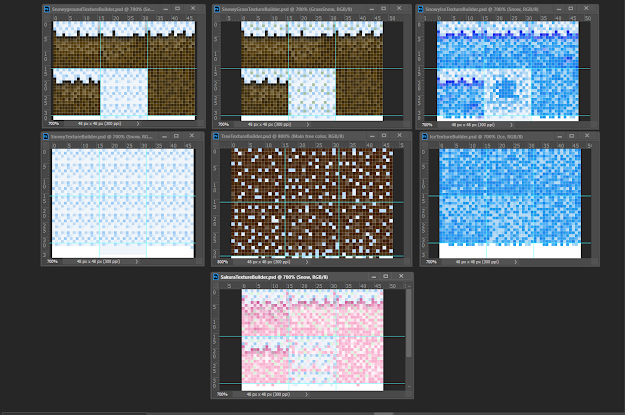
To start my level, I opened Maya and created a cube.  I added bevels and in the UV editor I organized my UV's based on the face they were and cleaned them up. I then got them ready for Photoshop.  In Photoshop I created 7 different textures.
Creating My Textures

After I finished created all my textures, I brought my textures back into Maya and see if they were working.  I applied the textures by creating a Blinn material and applying the textures in the Hypershade. 

Applying Textures in Maya

I set up a small scene to see how the cubes would react to lighting and having multiple cubes in the scene. 

Creating Small Scene 


From here I exported out my cube as an FBX and imported it into Unreal Engine.  I created a new level and began working in the material editor to get my textures and materials working.  
Material Editor with Textures

I then began the process of creating material instances for each of the textures.  After getting the textures in, I changed the settings on the materials so that cubes with the ice texture have a different effect than the snow and ground textures.  
Unreal Engine Materials and Textures

From there I began building my level!
Built Minecraft Level


Zenko Rig Reel

Zenko Rig Reel Zenko was my capstone character that I rigged and animated for Zenko: A Fox's Tale.  He is built to have a very reactive ...