Showing posts with label Lighting. Show all posts

Thursday, July 22, 2021

No Country for Old Men Sprint #12

 This week I worked on lighting and fixing the bifold door rig.  Earlier in the week I had level designer Joey critique the lighting I did in the level.  I messed around with the lighting in the hallway and tried to create two lights on both ends of the hallway.  Joey suggested having it a cooler color than a warm color. 

Placing Lights on Both Ends of the Hallway

After playing around with this idea I ultimately took out those lights and placed one light in the hallway behind the mannequin standing in for Anton.  After working with the hallway I went into the bedroom and checked the light complexity and found very little red.  The hallway by the light was in the orange range.

Bedroom Light Complexity

Hallway Light

 Since the bedroom was too dark, I added a few lights to brighten up the room so that the player can see better.  I also adjusted the settings on a few of the lights to blend them into one another.  

Adding Lights to Room

After many builds and changing settings on the lights I had my team test the lighting in the headset and I set images to three level designers for critique.  My team was able to see the room a lot better with the new lighting and I got positive feedback from the level designers. The biggest part of lighting that needs to be fixed is that there is no black and that the player should be able to see everything.  

New Lighting in Scene Angle #1

New Lighting in Scene Angle #2

Level Designer Brian Critique

Level Designer Teandre Critique

Level Designer Joey Critique #1

Level Designer Joey Critique #2

After having the professors also critique the lighting in the scene I took out the Sphere Reflection Capture and kept the Box reflection capture in the scene.  The lighting by the dresser was illuminating it too much so I also dimmed the ambient light in that area to still help the player see in that area but also have the dresser not look like it's glowing.  After messing with some of the settings we had an interesting issue with the shadows that appeared behind the fan on the dresser and an unknown shadow that appeared on the wall.  

Shadow Problem by Dresser

To combat this problem I changed the light mobility to stationary and dimmed the light down which made the odd shadows disappear.  I also turned off casts shadows. 

Shadow by Dresser Problem Solved

After working on lighting,  I got an update for the geometry used for the bi-fold doors.  I jumped into the rigging file after downloading the new geometry and imported it in.   I unbound the original geometry and deleted it out of the scene and then cleaned out the name space editor.

Old Bi-Fold Door Rig


Unclean Name Space Editor

After cleaning the name space editor I noticed that the door nobs were not in the same place as before so I hopped into the rig and disconnected a few constraints so I could move the door knobs back in place. I then constrained what I had unconstrained and checked to make sure the rig was still working as expected.  

Door Knob Fix

I then re-skinned the geometry back onto the rig which was flooding specific geometry to specific joints since this rig is very rigid.  
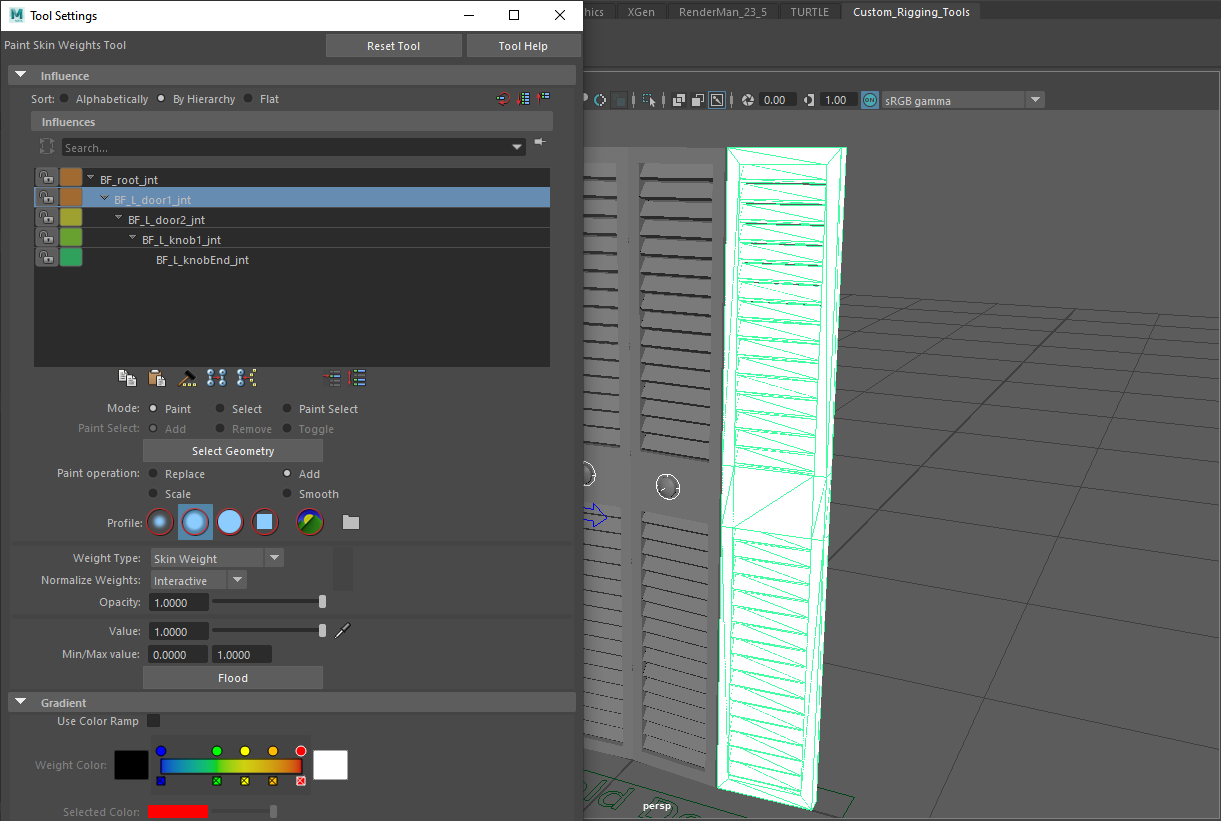
Flooding Skin Weights to Door

From here I updated this rig in engine and let my team know to check it in the VR head set for any unexpected issues.  

New Door in Engine


Friday, July 9, 2021

No Country for Old Men Sprint #11

 For this sprint I worked on adding the fixed money case rig to the engine and I worked on lighting.  I began to also get low drive space messages from my computer so I bought and SSD to help create space. 


Low Space Message from UE4

As I was working on the Money Case rig I found that the problem was because the geometry was in groups.  I froze transformation and deleted history and took all of the geometry out of the groups.  I then re-skinned my geometry to my joints and double checked that everything was cleaned.

Re-Skinning the Money Case

I then exported the rig and brought it into the engine with success!  

Money Case Rig in Engine

After I learned a little bit about optimization from my lighting assignment I decided to check out the scene and see what the optimization looks like.  I fixed some of the optimization on the geometry. 

Optimized Scene 

I also adjusted the fan light in our scene.  I moved it more on top of the light and I made the outter and inner cones bigger.  I also increased the intensity to help in areas that were a little too dark.

Adjusted Fan Light


Aside from adjusting the fan light I also added two ambient lights.  I turned off casts shadows and added them by the bed and the dresser.  One of the lessons I learned from the level designers is that ambient lights should have casts shadows turned off.  

Two Added Ambient Lights

In the past posts the hallway lights bleeding through the walls was an issue so I took out the extra lights and just have one light that is by Anton.

Fixed Hallway Lights

Another important lesson I learned from just being around the level designers was that you want your light importance map to be very close to where you want it to render.  So I adjusted the size of my light importance map and my post processing. 

Adjusted Post Processing and Light Importance Map

At this point I actually sent images to the level designers to get some feedback on where I could improve the lighting.  

Screen Shot #1

Screen Shot #2

Screen Shot #3

From two level designers I got critique.  Level Designer Joey thought I could improve the hallway light and the window light.  Teandre thought I could improve the lamp on the nightstand.  

Level Designer Joey Critique

Level Designer Teandre Critique

I actually jumped into a call with Teandre and he showed me how to work with lights that are in blueprints.  The lamp blueprint was not created by me and it had two lights in it.  To remove it we found a setting in the details and I was able to adjust one light in the lamp and remove the other light that was too high. 

Double Light Fix

Wednesday, July 7, 2021

Lighting a Scene


Angle 1 of Final Lighting Build 

This was an assignment in class where I learned a little bit more about lighting.  Mostly from this project I learned about optimization and that less can be more with lighting. The big lesson for me was the Overridden Light Map Res setting.  When I did some research about optimization the colors the maps turn is a big indicator on how optimized a piece of geometry is. I found some wrong information and spent time optimizing the scene incorrectly.  After asking some level designers some questions I did ultimately fix the scene and optimized the geometry correctly.

Incorrect Geometry Optimization

Once I fixed the optimization I was inspired by an amber bar look so I created a PureRef of all the images I found on Google that inspired me.

PureRef Reference Page

After looking at some images I began to place some lights in the scene where I thought they should go.  Many of my lights were on the ceiling on the level as my level does not have many natural light sources other than a light hanging above the piano. 

Placing Lights into the Scene

Once I placed my lights I began to work on the tone and colors of my lights.  I tried to keep it somewhat dark with warm tones coming from my lights.  I used temperature to create the natural warmth look.  

Using Temperature in My Scene

Originally my scene had a lot of highlights and many lights in the scene that was not needed.  After having a level designer critique my lighting I decided to improve my lighting. 
 
My Original Lighting

For my first big change I took out many lights from the ceiling and created one big light that lights the scene.  I then added candles to the scene to give more opportunity or light sources in the scene and I added ambience lighting.  

First Big Change in my Scene

For the second change I brightened my scene using my light that lights the entire scene, created variation to the candles, and added lights behind the curtains.  

Second Big Change in my Scene

From here I made some other smaller changes and created my high resolution screen shots.

Angle 2 of Lighted Scene


Angle 3 of Lighted Scene

Angle 4 of Lighted Scene

Angle 5 of Lighted Scene

Angle 6 of Lighted Scene

Angle 7 of Lighted Scene

Angle 8 of Lighted Scene

Friday, June 11, 2021

No Country for Old Men Sprint #9

 For this sprint I worked mostly on lighting, getting the scene ready for lighting, and watching the level design lighting videos.  I learned a new workflow strategy from Level Designers Brian and Teandre, learned more about the lighting tools UE4 has built in it and I cleaned up the scene a little bit for lighting.

One of the problems that our team faced with lighting was when the gameplay level (persistent level) is checked out.  When this level is checked someone is waiting on another person to check it back in to do their work.  To solve this I talked to both Brian and Teandre and they explained how the level designers work together on the levels for Zenko: A Fox's Tail.  Multiple level designers can work on a level together and have different layers, similar to photoshop, locked if they are working on it.  During common art class I met with both level designers and our technical director so we could learn how this system works with creating the layers and understanding how to work better together.  

Layers System in UE4

To get this window to pop up you go up to Windows and select Layers.  I dragged it over by my world outline.  After pushing levels I selected Create New and selected an empty level. I then named it the lighting level.  In order to move all of the lights to the lighting level, I selected the lights in the scene and I cut and then pasted them into the lighting level.  Teandre and Brian then talked about the tab in the bottom corner of the scene interface that will switch you between the persistent and lighting level.  It also serves as an indicator of which asset is on which level as it tells you which level your selection is on.  

Level Toggle and Selected Actors In

To further organize the scene any asset that is lighting I created a naming convention for so that it is easy to spot in the outliner and it tells you which level it's in. 

Lighting Naming Convention

After organizing the scene, I began to adjust some of the lights and add to the scene based on some of the tools that I learned about after watching the level design lighting classes by Alyssa.  My first adjustment was adding a lightmass importance volume around the level to make the lighting look better and more concentrated. 

Lightmass Importance Volume Selected in Level

I also added a spherical reflection capture and placed it in the room the player will be in.

Spherical Reflection Capture Selected in Level

From here I began to adjust and add more individual lights.  For the window light I learned that it is created by a directional light.  I rotated it to have a better angle on the floor for when the light comes through the window.  

Directional Light Shining through Window

I also adjusted the light that is above the dresser.  Without this light this corner is too dark. Originally it was placed in the ceiling and went through the roof of the level. I brought it down and added s little more light in that corner.

Spotlight above the Dresser

The area I spent the most time understanding lighting was the hallway.  I added two new lights, learned about attenuation, and temperature. Originally the hallway had one light that was on the floor.  It also had an orange color to it and it was static.  In the update I moved the light higher more where you would expect there to be a wall mounted light.  The attenuation radius was adjusted to that it is smaller.  For the color on the lights, I messed with the temperature setting and moves it to a yellow color.  Each of the lights is on stationary.  I learned from Teandre some of the differences between stationary and static. 

Hallway Lights in Level

An issue I am currently figuring out with lighting is the wall bleed issue.  Currently after building the top corners of the player's room you see a little bit of light showing.  

Light Bleed in Player Room Corner

Aside from working on lighting I am just beginning to work on the Money Case rig as I have just been given the model!

Money Case Model in Maya

Zenko Rig Reel

Zenko Rig Reel Zenko was my capstone character that I rigged and animated for Zenko: A Fox's Tale.  He is built to have a very reactive ...