Friday, May 28, 2021

No Country for old Men Sprint #8

 For this sprint I worked on creating animations for our bi-fold door, continuing to work on the phone cord blueprint, and talking to level designers about lighting in unreal engine.  I will also talk about my hero assets and the assets I have been responsible for.  

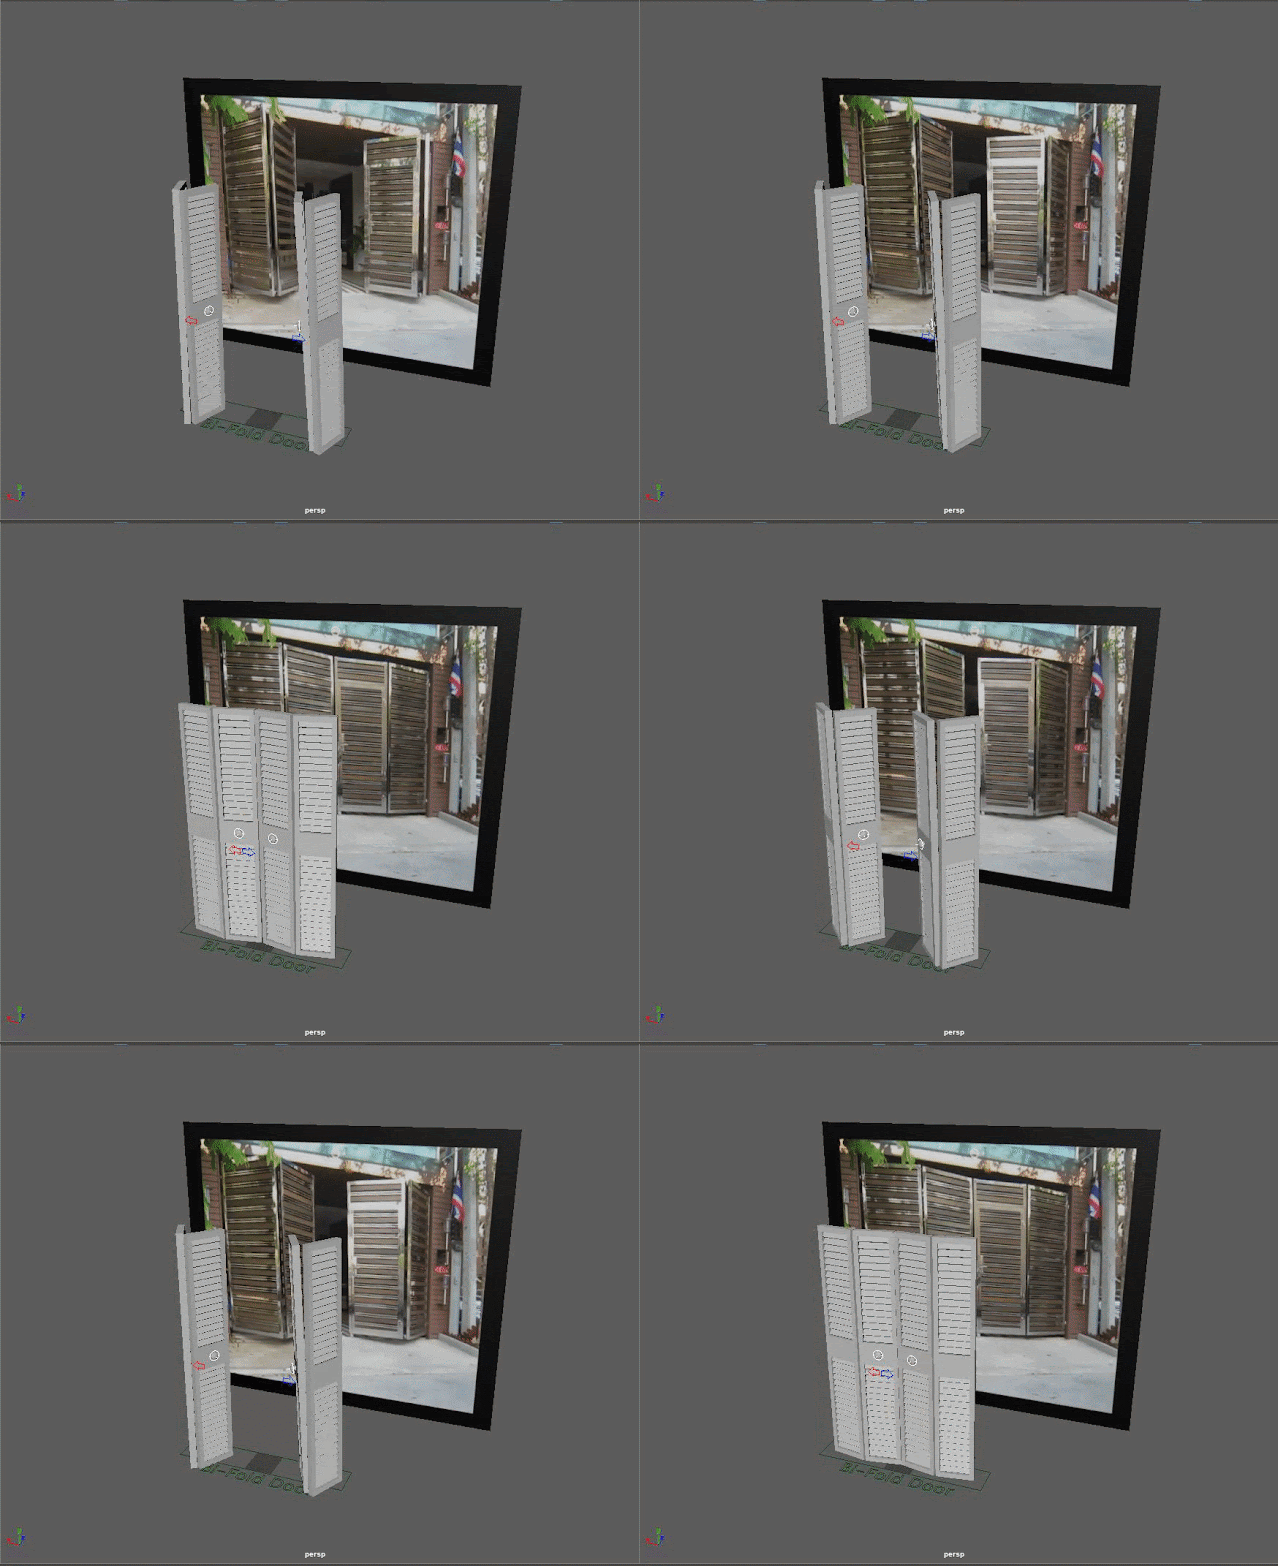
For the door I used my bi-fold door rig and animated it to some reference I found on YouTube.  I created two animations for the door, one for opening and one for closing.

Gif of Bi-Fold Door Closing with Reference

Gif of Bi-Fold Door Opening with Reference

Once I cleaned up the curves, I had our project lead and out technical director check it to make sure it was at a fast enough speed and adjusted the animation to fit the speed we were looking for.  

Gif of Bi-Fold Closing

Gif of Bi-Fold Opening

Once the animation was completed I created a folder in our unreal project for the bi-fold door animations and added it them.  The next steps for this asset is to adjust it based on what 

Gif of Bi-Fold Door Closing in Unreal Engine

So far I have not had success with the phone cord.  I have been able to successfully make it in the world(not as a blueprint).  To solve this problem I talked to Chris and I also asked about making physics constraints in blueprints on tech-artists.org.  Unfortunately it did not save when I worked with Chris on this asset.  However when I did tackle this problem on my own beforehand, I got this result.  

Gif of Broken Phone Blueprint.

In the blueprint I worked with trying to replicate what I had created in the world and I found that some of the settings are unavailable.  Settings that I used in the world to connect the constraints are what make it possible to constrain properly while in the world.  So I'm continuing research and asking questions to get this asset working.

Phone Cord Blueprint Showing one of the Physics Constraint

I took on lighting for this project.  To really understand how to approach lighting I spoke to two level designers, Teandre and Brian and they gave me tips, a power point, and some videos to look at.  Some of the tips they gave me was to understand the different lighting models (static, movable, and stationary). They also told me about fake lighting with using a skylight, color schemes, and attenuation radii.  

Videos and Power Points from Teandre

Tips from Brian

My hero assets include:  The shot gun rig, phone cord blueprint, money case rig and lighting.

Shotgun rig is completed however this asset can have more rigging done to it based on how our technical director would like to proceed.  At the moment, the shotgun can move all of it's parts and has animator friendly locators to constrain to, however the shotgun bullets are not rigged.  The shotgun bullets are being worked on by our technical director.

Shotgun Rig with Textures

Phone Cord is currently being worked on and troubleshooted.  The phone cord by itself interacts with the ground as expected however in the past the cord would fly into space if the player interacted with it.  This has not been tested in the scene as a physics constrained asset.  Player interaction and collisions are going to be tested for this asset when it is ready to be put into our scene.  

Gif of Broken Phone Blueprint.

The Money Case Rig is currently still in modeling stage.  The game rez of the model is still being worked on but the considerations for this asset is that it has a basic rig, it needs to be able to open and close, and it needs to hold items such as money and the tracker.  This asset is also a physics asset.

I took on lighting for this project to learn a little bit more about lighting.  To start understanding lighting I talked to two level designers and I got some tips, videos, and power points to get me started.   

Assets I have been and will be responsible for are: shotgun rig, phone cord blueprint, bi-fold door rig and animations, lighting, and the money case rig.


Gif of the Bi-Fold Door Closing Animation in Unreal Engine

Our schedule is planned out for each individual on the team.  In a time span of certain dates each of us works on specific tasks or completes tasks.  

Image of Team Schedule(The schedule document is very long)


For assigning assets, the modelers have a document that shows where each of the assets are in their process of completion in the modeling stages.

Image of Assets Assigned to Modelers


Wednesday, May 26, 2021

Trimming Mocap Data and more Cleaned/Characterized Animation

Gif of Cleaned and Characterized Single Lady's Dancing Storm Trooper 

This week I learned about trimming in motion builder and I cleaned and characterized three mocap animations.  For trimming I worked on the basic walk animation and the idle.  To start off my trimming process I selected the skeleton in the scene and in the FCurves and selected the translations and rotations.  Selecting the skeleton was a little finnicky as the FCurves didn't always appear when I selected it.  

Skeleton Selection and FCurves in Motion Builder

From here I went into the filter's tab in the resources section.  I would place my marker on the time line and hit Set Start and then place the marker where I wanted to cut animation and push Set Stop.  After selecting cut I pushed Preview and Accept. I also did this towards the end of the animation where I wanted to trim off the ending.  

Filters Tab in Motion Builder

To adjust my timeline, I moved the ending to the last frame in my animation.  When you trim the beginning of animation, the first frame of the trim starts at 0 automatically so you do not need to adjust the beginning of the timeline. 

Trimmed Timeline in Motion Builder

Gif of Trimmed Walk Cycle in Motion Builder

Following the same process I trimmed the idle animation.

Gif of Trimmed Idle Animation in Motion Builder

After trimming the idle and the walk cycle I worked on three new mocap animations.  Because I used a women for the idle and the walk I decided to go with mocap data from a man.  These animations are currently cleaned and characterized.  

Gif of Storm Trooper Dying(Electrocuted) in Motion Builder

For one of the animations I decided to try an animal and found this cat animation.  This animation needs more work done to it as the hands are not touching the ground and the armor would clip through the ground.  Overall I thought seeing what happens when you work with an actor acting as an animal and then working with this animation in motion builder was really interesting.  

Gif of Storm Trooper Acting like a Cat in Motion Builder

Gif of Cleaned and Characterized Single Lady's Dancing Storm Trooper


Tuesday, May 25, 2021

Project Management Tool: Getting My Ideas

 For the beginning of my project management tool, I wanted to plan it out.  Planning out how a tool works and the design always helps me visualize how my tools are going to work and what my end goal is.  What I considered for my project management tool is, data structure, naming conventions, and the UI of my tool.  Using illustrator I created a simple data structure with the Facility folder on the top level and my project folder being a on a lower level of my project management tool.  To make it easy to understand I color coded my data structure.  

Project Management Tool: Data Structure


Creating a data structure has made me realize that there's a lot of thought that goes into making sure that everything is clean and organized.  There's also a lot of different departments that need to be thought of.  Aside from creating an organized data structure, I also created some naming conventions.  My tool needs to consider the way that assets move from the art depot to the game depot.  The art depot has a slightly different naming convention than the game depot because of the way Unreal Engine names it assets.

Project Management Tool: Naming Conventions

While this is a lot of naming conventions, there are still some naming conventions that need to be considered such as the animation reference files.  Naming conventions are an incredibly important part of the organization of a project as well as a make or break because some programs such as Maya will break if a naming convention is incorrect.  With programs such as Maya in mind, I go into the design of my interfaces.  For my interface design I chose a window with two tabs.  One tab that works on creating projects and one tab that works with creating assets.  Switching between the two tabs should be easy and simple and both interfaces should be clear to understand. When you first open the tool you should be on the Project Manager tab that will allow you to create new projects, show you existing projects, rename projects and delete projects.

Project Management Tool: Project Manager UI Design Idea 

While the project manager tab creates projects easily, the asset manager tab works specifically with creating specific types of files such as maya, ZBrush, houdini, photoshop, and illustrator.  This window also considers if the asset is an animation, model, or rig.  Showing the user current projects the user is able to rename an asset, delete an asset, and cancel.

Project Management Tool: Asset Manager UI Design Idea 

Tuesday, May 18, 2021

Cleaning and Characterizing MoCap Data in Motionbuilder


Gif of Clean and Characterized Motion Capture Data with Character Attached

Cleaning and characterizing motion cap data is simpler than I imagined especially since this is my first experience with Autodesk Motion Builder.  When opening motion builder for the first time, I first set up my settings so that to navigating the perspective view is exactly like Maya. 

Setting Up Settings for Interaction

I also learned about the hot keys ctrl + W which toggles between schematic view and producer perspective view.  The other hotkey I learned about was ctrl + A  which can show the model only, x-ray of the skeleton (rig), or no skeleton.  

Schematic View

Opening the motion capture data is as simple as navigating to your motion capture FBX and simply opening it.  For my project I created a dedicated folder to hold multiple folders to organize my files as I am cleaning two motion capture FBX's and using a character rig.

Navigating and Opening Motion Capture

I really didn't know what to expect when I opened the motion capture data, but it was messier than I thought as you find unmarked markers, camera systems, and markers on the skeleton.  

Not Cleaned and Characterized Motion Builder Scene

After opening the scene I learned about the timeline.  I found it really interesting to hear about how the unmarked markers appear in the motion capture data.  When the character walks in the scene the unmarked markers don't move with the animation like the markers on the skeleton.  They stay in place.

Timeline Gif

At this point I opened up my schematic view and began to clean the file.  I took out the camera system, marked markers, unmarked markers, and the stick markers that were in my scene.  I left the skeleton data, position data, and the actor data in the scene.

Original Schematic View

Cleaned Schematic View

With my schematic view cleaned, my perspective view changed to show just the skeleton.

Clean Perspective View

From here, I needed to clean my rotations on the skeleton.  To do this I grabbed the entire skeleton and in the properties I changed all the rotation values to 0.  This made the skeleton lay on it's back looking straight up.  

Rotations on Entire Skeleton at 0

I then grabbed the skeleton's hip joint and in the properties changed the rotation x value to 90.

Rotate Hip to 90

I once again grabbed the entire skeleton, not the position or the uppermost node, and changed my timeline to start at 0.  I then keyed the skeleton at 0. 

Keyed Skeleton at 0

At this point the skeleton is ready to be characterized! In the asset browser under resources you will find characters under templates.  Under characters drag character onto the hip joint of the skeleton and push characterize and then biped.  I got very lost the first time I did this so I'm writing it down so that it's easy to understand and remember.  

Characterized Skeleton

I then took a step further to make sure my scene was very organized.  I went to my navigation tab and under characters I renamed character to MoCap so that it is easy to know what my mocap data is.

Organized Mocap Data

My scene is now cleaned and characterized!

Gif of Cleaned and Characterized MoCap Walk

Since I did two mocap animations I followed the same steps above for my idle animation.  

Gif of Original Idle Animation MoCap Data

Gif of Cleaned and Characterized Idle Animation MoCap Data

To really bring these animations to life I grabbed a rig from the FIEA mocap rig library.  I personally don't know anything about Fire Emblem however I thought it would be fun to use one of the Fire Emblem characters in the library.  Bringing in a character is the same as navigating to your mocap FBX file and just pushing open. 

Azura in Motion Builder

To get your motion capture FBX in your character file is very simple as you just open your cleaned and characterized folder holding your animation FBX and drag it into motion builder.  You then merge the FBX into the scene.  You should then see MoCap appear in your characters along with the character rig in navigation.  

Character and Mocap in Navigation

From here I selected the Azura Character and in the Character Settings I changed Input Type to Character and then Azura was connected to my mocap animation!

Changing Character Input Type

Gif of Azura Walking

Gif of Azura Idling 
Friday, May 14, 2021

Hades Facial Rig Reel

Hades Facial Rig Reel

For this project I worked with Hades who was modeled by Ky Campbell from cohort 16.  Hades is a capstone character from Penguin Void Productions' game Kore.  This project was a lot of fun and a big challenge as I have never fully rigged a character's face.  This rig is a joint based facial rig with two blenshapes for squash and stretch. There is also over 70 controllers and this reel only shows a few.  Posing Hades was a lot of fun as his eyebrows are very expressive, his eyebrows are arguably my favorite part about Hades.  A lot of the ideas I got for his expressions were from looking at reference of people such as happy, bored, surprised, nervous, ect. I had the most fun posing Hades as a villian, his smile makes him look more like a villian than happy.  Another fun part of Hades was making his ears.  The ears are very simple but they can be very cartoon like with how you can scale and pose them so I did a pose where I was able to scale one of his ears.   The most difficult part about rigging Hades was his eyes as he has two ways to control his eyes, a controller for each individual eye and another that manipulates both.  Hades eyes can be a bit crazy, but they have a wide range of motion with individual manipulators in the eyelids to completely change his eye shape and controllers that control many manipulators for movements like blinking.  Overall, this project was a challenge and I could have done better in a few areas but this project makes me want to learn more about facial rigging.

Zenko Rig Reel

Zenko Rig Reel Zenko was my capstone character that I rigged and animated for Zenko: A Fox's Tale.  He is built to have a very reactive ...