To further my hair knowledge in the real time world, I learned Blender and used Unreal Engine 4. Blender is a very new program for me and I chose use blender because I have seen a lot of people using blender for various projects and bringing it into unreal engine.
My Friend Abi's Hair in Unreal Engine
Gif of Red Hair, Inspired by my Friend Wilson, in Unreal Engine
To start the process, I created a 3rd person project in unreal engine. I went up to edit and under plugins I enabled both Alembic Groom Importer and Groom and restarted the editor. When you open the project it took some time to compile shaders. This is allowing me to import strands from an alembic file and render the simulation.
Alembic Groom Importer and Groom in Plugins
while the shaders were compiling I opened up Blender and imported my UE4 man into the scene. I deleted everything in the scene before I imported. I went into edit mode and selected on the head where I want the hair to appear.
UE4 Man in Blender
Selection of Geometry on UE4 Man's Head
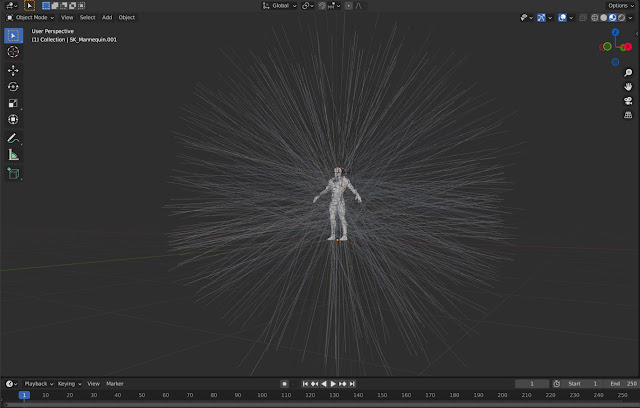
With the selection, I created a group and named it hair, this makes it easy for me to grab that same geometry again. In blender I created the hair using a particle system and then switching the type to hair. I ran into an issue where the hair generated all over UE4 man. I forgot to tell where I wanted the hair to generate so it went everywhere.
Creating Geometry Group in Blender

Hair Generated all over UE4 Man
To make the hair appear where I want it to, I went into the Density setting and set it to the hair group. I learned that UE4 man is a series of groups in blender so I could generate hair just on his hand or just on his foot.
Hair Generated on UE4 Man's Head
After generating my hair, I began to get familiar with the tools in Blender to edit and create hair styles. The first one I learned about was the Length setting. This one controls how long your hair is and is usually the first setting you adjust to begin creating your hair style.
Gif of using the Length Setting
To begin styling your hair, you need to be in particle edit mode. This brings up a series of tools that you can manipulate the hair with.
Comb Tool - Quite literally brushes the hair
Gif of the Comb Tool
Smooth Tool - Removes kinks for the hair
Gif of the Smooth Tool
Add Tool- Adds hair
Gif of Add Tool
Length Tool - Adds and Subtracts length to the hair
Gif of Length Tool
Puff Tool - Moves the strands away from each other
Gif Puff Tool
Cut Tool - Cuts the hair
Gif of Cut Tool
After getting familiar with the tools, I found some reference and got to work stylizing. I went simple with my hair style, its harder than it looks to stylize the hair. I tried to create the middle hair style in my reference. From my experience with this first hair style, trying to even out hair in the shorter areas is what took most of my time.
Hair Reference, I went with the Middle Hair Style
Hair Style in Blender
Once I got my hair style, I learned a little bit about interpolated strands. In blender you first need to be in object mode, basically interpolated strands help with how the strands interact with one another. It's a parent child relationship that physics is calculated from. If you go intot he particle settings and select children you can make it interpolated. When you mess with this setting it can get very tricky as you need to make sure the settings for display amount and render amount is the same. Display amount is how much blender will show you and render amount is how much will export. By default the render amount is 100 which is too big. Blender looks at the render amount and will add 100 hairs for the hair you already see in the scene. I put both of these settings at 20, keeping them the same will give you the result you are expecting.
Children Settings
To properly export the hair, I went under Particle settings, render, and I turned off show emmiter. I unhid the skeleton in my scene and then selected both the mesh and then the skeleton and went up to file and export and selected alembic. The recommended settings I found was to have the scale at 100, start frame at 1, end at 1 and have only selected objects and visible objects.
Export Settings
To get the hair in unreal engine. I made a folder to keep the hair organized and imported it. A specific groom icon appeared which meant the plugins were working. I also found that in the groom settings before you import you need to make sure the rotationX is 90 degrees and the ScaleY is -1, unreal and blender disagree which way is up.
Hair Icon
Groom Import Settings
Hair in Unreal Engine
To get the hair onto UE4 man, I selected his skeletal mesh and added a new components. I then opened the third person character. with the groom component selected, I went into the details and in the groom asset I selected the hair. I found that the hair will appear but will float off the character. This is a common problem so I learned about created binds. I went back to the groom asset and right clicked on it. I selected create binding and then a new window popped up. I put in SK_Mannequin and pushed create.
Floating Hair Problem
Hair Binding
In your binding asset in the character asset blueprint, plug in the hair. Now the hair will attach to your character and follow them.
Hair Attached to Character
Hair on UE4 Man in World
In Unreal Engine i found that the groom settings in general are nice. Very easy to navigate and try new settings out. The strands tab works with how your hair looks on a strand basis. The most common settings you will use is hair width, hair root scale, and hair tip scale. Another fun setting is the hair clip scale.
UE4 Strands Settings
I noticed that the hair didn't really move on the top of the head so I added some physics to the hair. Physics helps make the move appropriately depanding on what the character was doing. In the groom physics setting you can enble simulation. This makes the hair jiggly. You can also use air drag, bend damping, and bend stiffness.
Gif of Jiggly Hair
After getting jiggly hair I decided to change the color of the hair. By default the hair comes in blond. I created a new material and in the shading model I changed it to hair. Under usage change it to used with hair strands, it won't work otherwise. I created a simple hair shader with just color, scatter, specular, and roughness.
Red Hair
To experiment with Physics further, I put the hair that is first generated in blender into unreal engine and messed with the physics. I was really curious as to how it would look. I've come to learn that sometimes physics can change the look of your hair all together. It had a difficult time rendering the shadow so it would put a box over the character.
Extremely Long Hair in UE4
To get some more practice, I created my friend Abi's hair. her hair is partially saved on one side and is a bright blue color. To start I brought the UE4 women into Blender and selected the geometry I wanted to generate hair on and instead of creating a group for it, I duplicated it. I then generated my hair particle system on it.
Hair that is Similar to Abi's
UE4 Women in Blender with Hair Particle System
In total to create Abi's hair it took me 7-8 hours. This being my second time creating a hair style, I learned more about each of the tools and some of the other setting they have which helped a lot with solving problems such as evening out the shaved part and fixing bald spots. Sometimes when fixing the hair blender would also apply it to the other side of the head so I had to constantly check and make sure I didn't make this mistake. I also had to go between object and edit mode to see the hair. In edit mode the hair turns black and to make sure the strands were going in the correct direction in was a constantly switching back and forth.
Abi's Hair in Edit Mode
To create Abi's hair color I tried a different approach. I learned how to use the texture paint tool in blender. Its's similar to the node editor in Maya or blueprints in UE4. I also checked the UV's so that it filled the entire UV space and unwrapped it. Texture paint has many interactive tools that allow you to quite literally paint texture onto the hair. I learned that when you are painting, you are paining on the root of the hair.
Shader Tab in Blender
Gif of Texture Paining Abi's Hair
Currently I'm coming up with a solution to bring Abi's hair color into Unreal engine. I tried a different method where you create a separate geometry and line it up with the hair and then you unwrap the geometry and scale it's size. After that you bake Abi's hair texture to the object and export it into unreal engine, But for now I have her in unreal engine with a simple shader to create her blue hair.
Abi in Unreal Engine


